
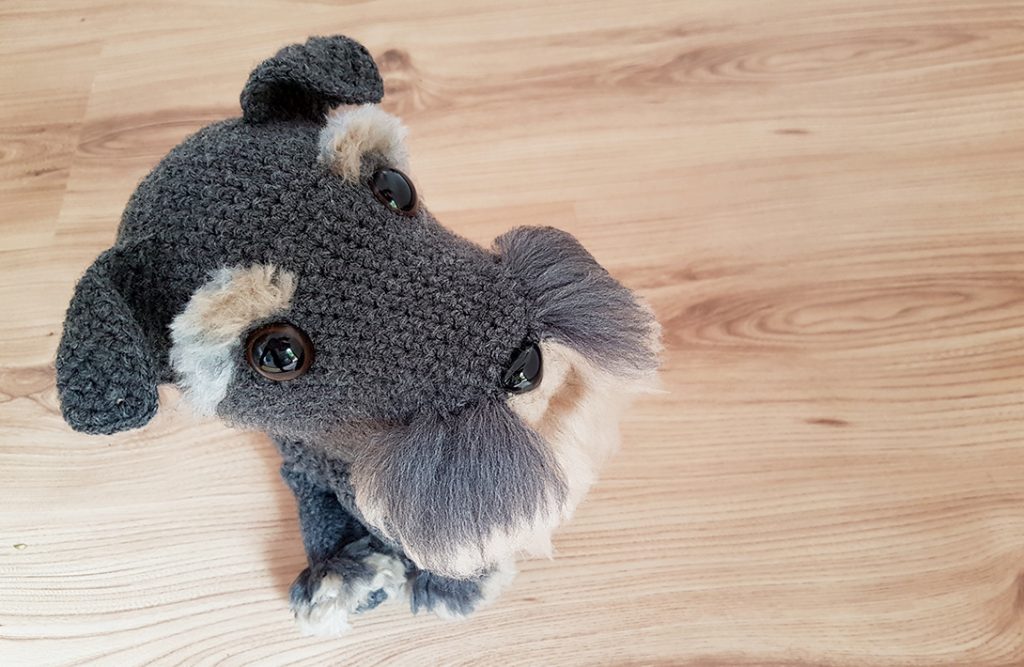
Meet Winchesterton the Third. He’s a Schnauzer dog.
This doggy wasn’t always this dapper looking, though. He went through an awkward phase while his fur was growing and all the other puppies laughed at him – but more on that later. For now I’ll ask you kindly not to stare, point, or make any hilarious – er, I mean inappropriate– remarks about his abnormal hair growth.
It would be insensitive, for example, to call him Spaghetti Snout, or Noodle Nose, and would probably him cry. Not that I would know, of course – I’m a nice person who definitely didn’t come up with those mean names.

INTRO
This is Part 1 of the pattern. This part will teach you how to make the dog’s body from start to finish, without any fur. Part 2 will be a tutorial on how to make and attach your very own handmade doggy fur, so keep an eye out for that! (Hit subscribe if you want an email notification!) UPDATE: Part 2 is live! Click here for Part 2.
UPDATE: This pattern is now available in Dutch, too! Click here for the translated version.
HOW CAN I POSSIBLY THANK YOU FOR THIS AMAZING PATTERN?
Winchesterton III’s pattern is totes free – yes, this is your lucky day! So pay it forward by sharing it with all your crochet buddies, comment to let me know how much you love it and how it was worth my while to bestow such a generous freebie on the crochet populace! XD If you find that you like my pattern writing style, you can support my dream and feed your passion with my Premium Patterns!

WHAT TYPE OF YARN SHOULD I USE?
This is a very important point! You’ll be using some of the same yarn for your dog’s body and his fur, so make sure you start off with the right stuff! To make the fur, you’re going to be brushing the yarn out, so you need yarn that will turn fluffy when you brush it. So cotton or anything stringy wont work! If you unravel a thread of yarn and it separates into strings, it’s not going to turn into fur! You can test by brushing the very tip of a thread of yarn to see if it goes fluffy.
Read “PATTERN DETAILS” below for more info on yarn weight and brand!
YOUR CROCHETING IS SO NEAT! HOW DO YOU DO IT?
I know right – just try and spot my decreases! Can’t see them? That’s because I use the magical Invisible Decrease and other way cool tricks! You can learn all about the best decreasing method ever, and my other secret techniques at this blog post:

PATTERN DETAILS
SUPPLIES YOU’LL NEED
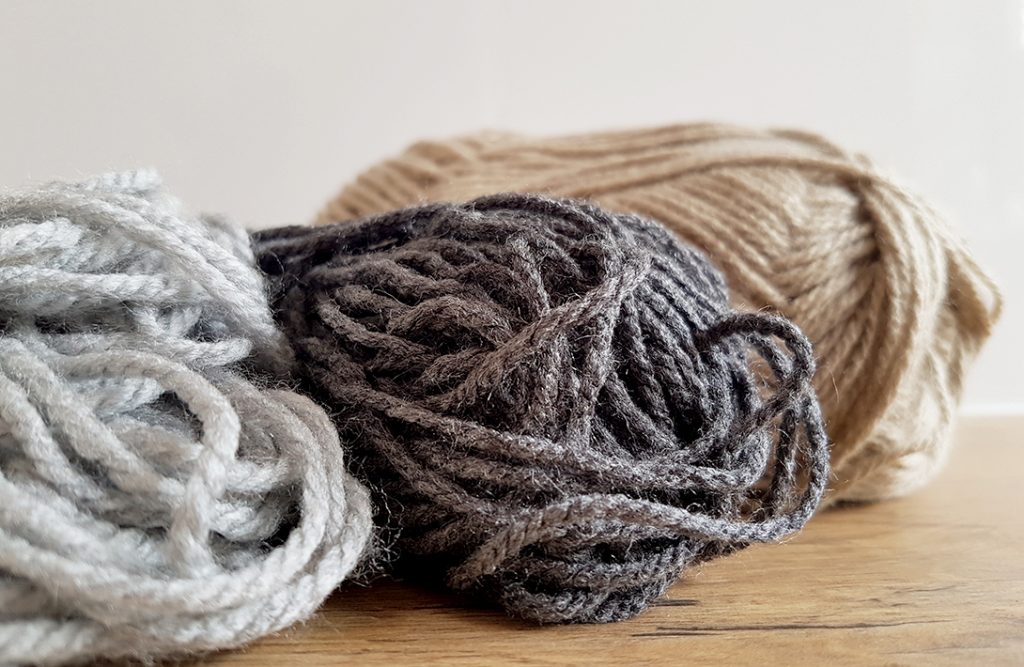
Yarn in main body colour (I used almost a whole 100g ball of Dark Grey)
Crochet Hook: 3mm (Size 11)
Yarn sewing needle
Sharp scissors
Safety eyes: 21mm
Safety nose: 18mm W x 15mm H
Stuffing
NOTE: in Part 2, you’ll need extra supplies for the fur, including:
Yarn in fur colours (I used less than a 100g ball of Light Grey and Beige)
Slicker brush AKA cat brush (one that hasn’t been used on real cats!)
Optional: Felting needle
CROCHET PATTERN INFORMATION
- Written in US terminology
- Difficulty: Easy – Intermediate. The body itself is easy, but the fur presents more of a challenge.
- Necessary Skills: The magic ring, working in the round (in a spiral) and the crochet stitches listed below in abbreviations. The pattern with teach you how to make the fur in Part 2.
- Yarn Weight: Double Knit (Light Worsted / 8ply/ 11wpi)
- Yarn Brand: I used a South African brand called Charity. I realize most of you aren’t in SA, so use any brand that will successfully produce fur, as described above in “WHAT TYPE OF YARN SHOULD I USE?”
- Gauge: Not critical with amigurumi. Using the suggested hook and yarn combo will make a dog about 25cm tall. Your tension should be tight enough to conceal the stuffing inside.
- Note: The dog’s entire body is inside-out! Turn all pieces inside-out before stuffing them. If you’re doing Invisible Decreases, make sure they’re also inside-out!
ABBREVIATIONS
- R = Row
- CH = Chain
- ST = Stitch
- SS = Slip stitch
- SC = Single crochet
- *…* = Section to be repeated
- Hk = hook
*
Let’s get started, shall we?
*
CROCHET INSTRUCTIONS
BODY
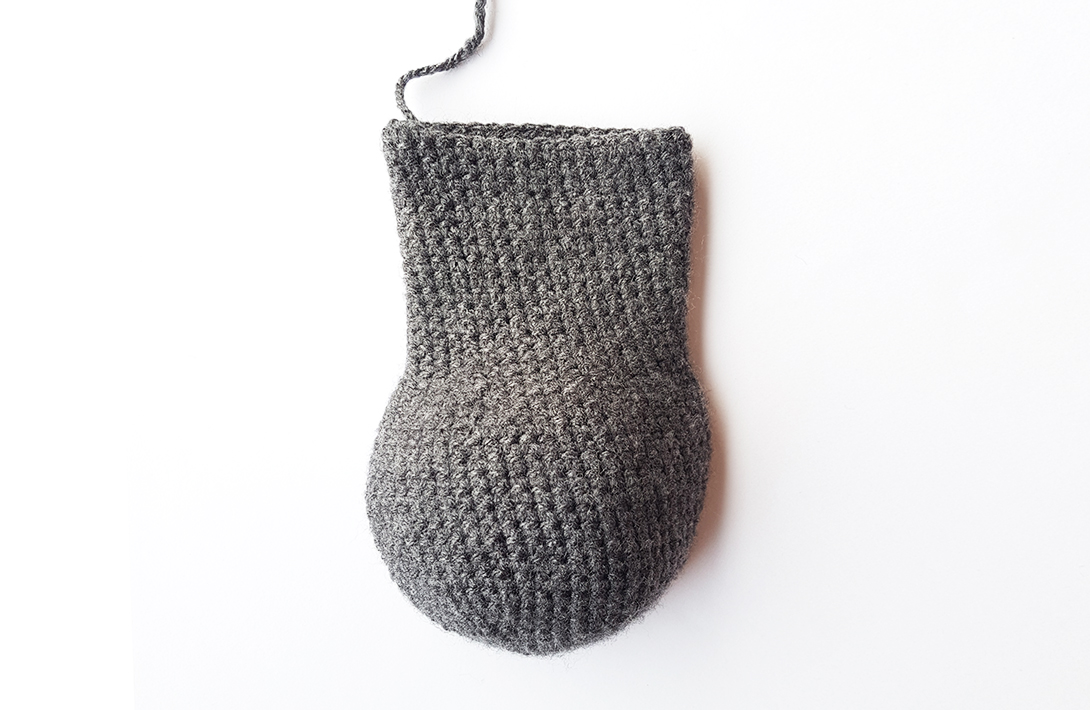
R1: 6 SC into a magic ring. (6)
R2: Continue working in the round. 2SC in each st around. (12)
R3: *SC in next st. 2SC in next st.* Repeat all around. (18)
R4: *SC in next 2 sts. 2SC in next st.* Repeat all around. (24)
R5: *SC in next 3 sts. 2SC in next st.* Repeat all around. (30)
R6: *SC in next 4 sts. 2SC in next st.* Repeat all around. (36)
R7: *SC in next 5 sts. 2SC in next st.* Repeat all around. (42)
R8: *SC in next 6 sts. 2SC in next st.* Repeat all around. (48)
R9-22: SC in each st around. (48)
R23: *SC in next 6 sts. SC next 2 sts together.* Repeat all around. (42)
R24: *SC in next 5 sts. SC next 2 sts together.* Repeat all around. (36)
Start stuffing the body firmly, and continue stuffing as you go.
R25-40: SC in each st around. (36)
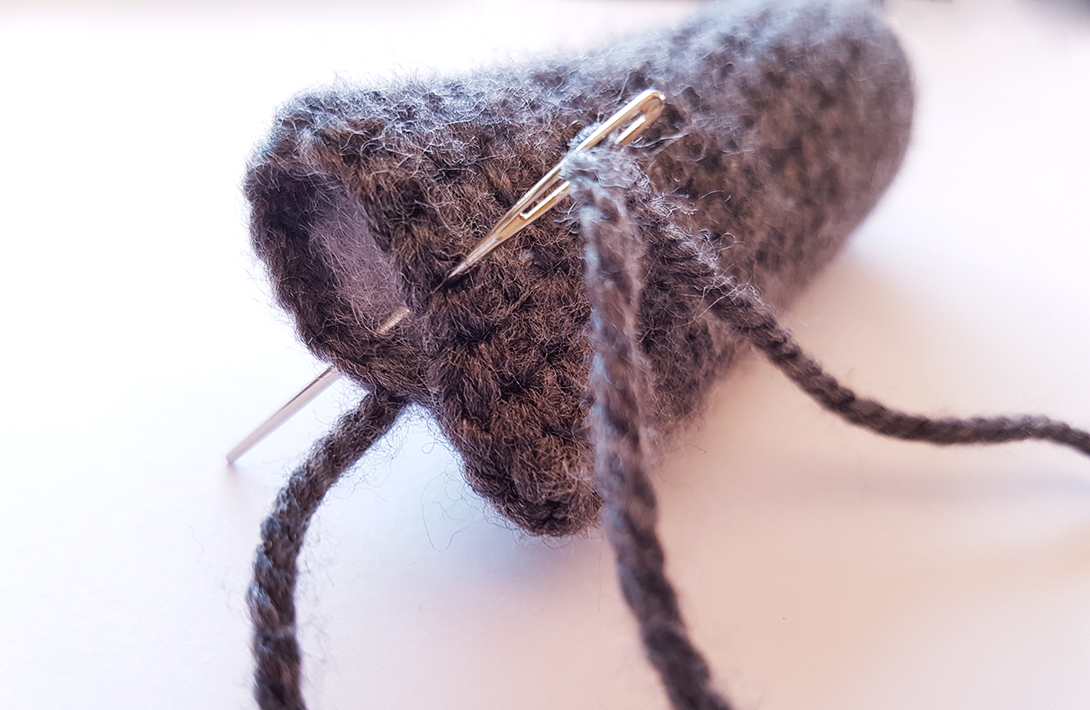
Tie off, leaving a long thread for sewing body to head.
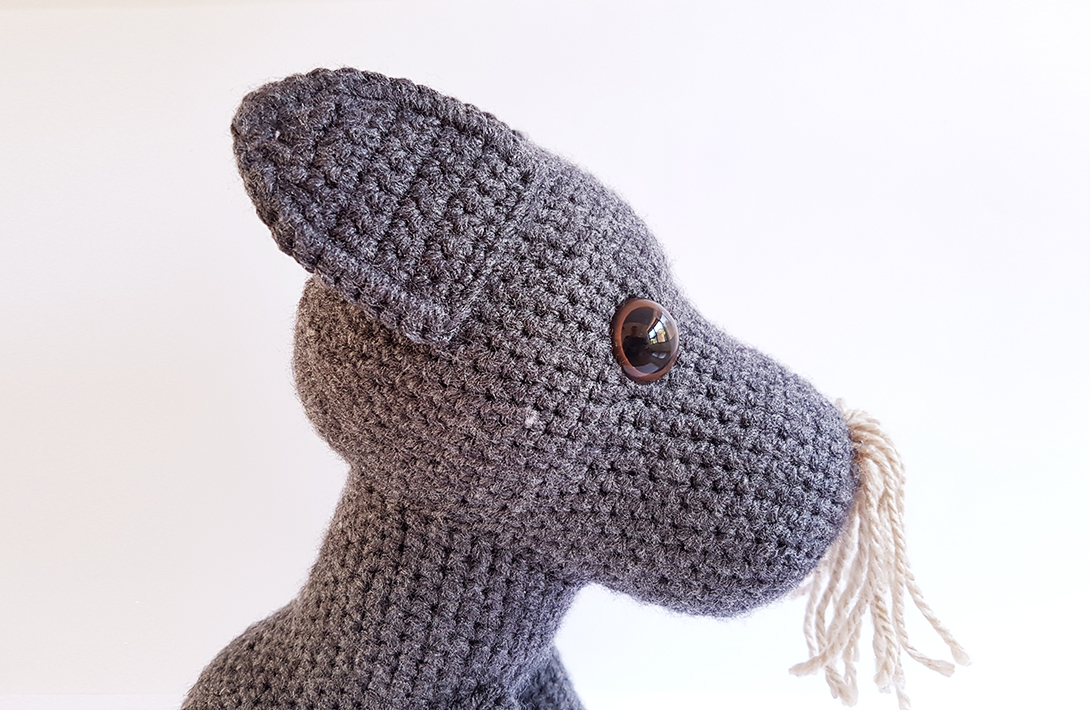
HEAD

Those rather silly looking tentacles around his nose? I put them there before attaching my safety nose because I was worried the nose’s backing would get in the way later and I wouldn’t be able to get my hook in there to attach fur. Turns out, it was unnecessary, so you don’t have to do it. We’ll get to the fur later, and for now we’ll politely ignore this incredibly silly snout.
R1: 6 SC into a magic ring. (6)
R2: Continue working in the round. 2SC in each st around. (12)
R3: *SC in next st. 2SC in next st.* Repeat all around. (18)
R4: *SC in next 2 sts. 2SC in next st.* Repeat all around. (24)
R5: *SC in next 3 sts. 2SC in next st.* Repeat all around. (30)
R6: *SC in next 4 sts. 2SC in next st.* Repeat all around. (36)
R7: *SC in next 5 sts. 2SC in next st.* Repeat all around. (42)
R8-19: SC in each st around. (42)
R20: *SC in next 2 sts. 2SC in next st.* 7 times. Mark the 14th st – this is the middle of the face. SC in each st remaining. (49)
R21: *SC in next 3 sts. 2SC in next st.* 7 times. SC in each st remaining. (56)
R22-33: SC in each st around. (56)
Attach the safety eyes and nose now.
Eyes: Position them on the face between R20-21. Leave 16sts open between the holes where the eyes are inserted.
Nose: Place it in the center of the face between R5-6.
Start stuffing the head and continue stuffing as you go.
R34: *SC in next 6 sts. SC next 2 sts together.* Repeat all around. (49)
R35: *SC in next 5 sts. SC next 2 sts together.* Repeat all around. (42)
R36: *SC in next 4 sts. SC next 2 sts together.* Repeat all around. (35)
R37: *SC in next 3 sts. SC next 2 sts together.* Repeat all around. (28)
R38: *SC in next 2 sts. SC next 2 sts together.* Repeat all around. (21)
R39: *SC in next st. SC next 2 sts together.* Repeat all around. (14)
R40: *SC next 2 sts together.* Repeat all around. (7)
Tie off and sew closed.
FRONT LEGS

R1: 6 SC into a magic ring. (6)
R2: Continue working in the round. 2SC in each st around. (12)
R3: *SC in next st. 2SC in next st.* Repeat all around. (18)
R4-23: SC in each st around. (18)
Tie off, leaving a long thread for sewing the leg closed and attaching it to the body.
Stuff the leg firmly until it is half full. Continue stuffing less firmly to taper the leg off as you fill it up, ending with almost no stuffing at the opening.
Sew the leg closed.
Make 2.
BACK LEGS
R1: 6 SC into a magic ring. (6)
R2: Continue working in the round. 2SC in each st around. (12)
R3: *SC in next st. 2SC in next st.* Repeat all around. (18)
R4-19: SC in each st around. (18)
Tie off, leaving a long thread for sewing the leg closed and attaching it to the body.
Stuff the leg firmly until it is half full. Continue stuffing less firmly to taper the leg off as you fill it up, ending with almost no stuffing at the opening.
Sew the leg closed.
Make 2.
EARS
R1: Ch9. SC in 2nd ch from hk. SC in each ch. Ch1, turn. (8)
R2-7: SC in each st across. Ch1, turn. (8)
R8: SC 1st 2 sts together. SC in next 4 sts. SC last 2 sts together. Ch1, turn. (6)
R9: SC 1st 2 sts together. SC in next 2 sts. SC last 2 sts together. Ch1, turn. (4)
R10: SC 1st 2 sts together. SC last 2 sts together. Ch1, turn. (2)
R11: SC 2 sts together. Tie off.

SC around the edge of the ear: Starting at the 1st ch, insert hook and join yarn with a SS. Work the tail in as you proceed. SC in same st. Crocheting evenly into the free edge of the ear, work 12 SC up the side. Once you reach the tip (R11), work 2SC into the st. Crocheting evenly into the free edge again, work 12 SC down the other side of the ear. Leave the 3rd free edge un-worked. Tie off, leaving a long thread for sewing ear to head.
Make 2 ears the same.
TAIL
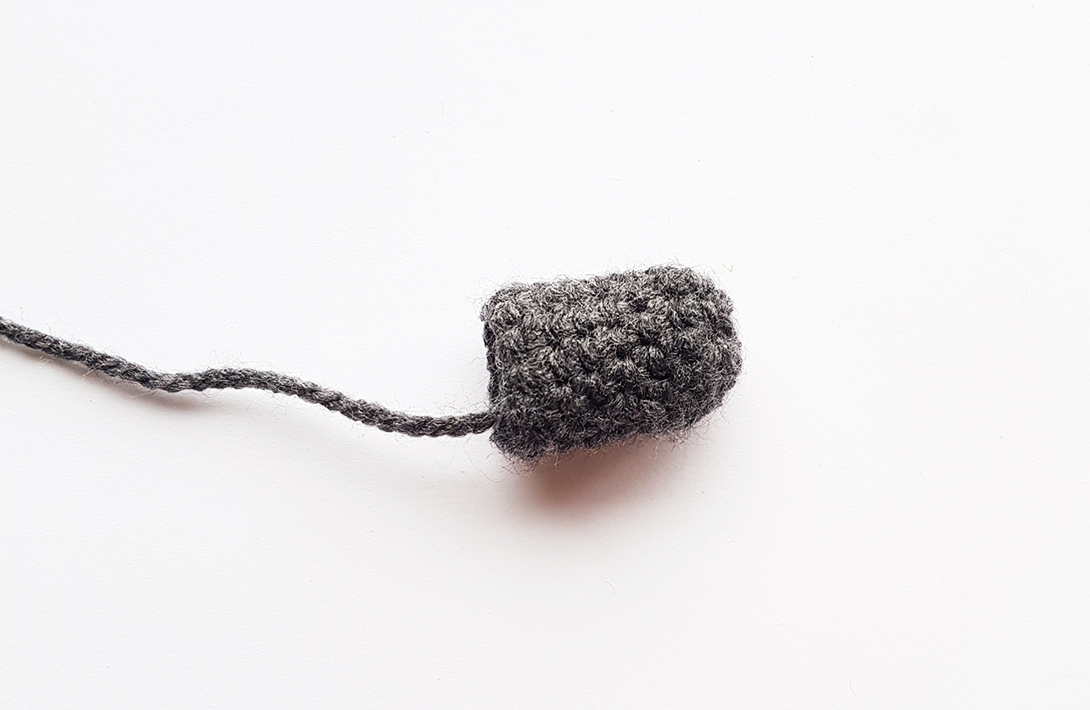
R1: 6 SC into a magic ring. (6)
R2: Continue working in the round. 2SC in each st around. (12)
R3-8: SC in each st around. (12)
Tie off, leaving a long thread for sewing tail to body.
Stuff firmly.
*
Well done – you’ve finished making all the pieces! Time to start assembling everything….
*
ASSEMBLY INSTRUCTIONS
Note that the limbs and head don’t need to be sewn in the exact same position as stated below. Try pinning your dog together and adjust the features according the the type of character you want to create.
FRONT LEGS

Start with the front legs. Position them on the body at roughly a 45 degree angle between R25-31. Between the highest points, leave 6 sts open across the chest, between the legs.
Sew the legs in place along the edge that you previously sewed closed.
BACK LEGS

Sit the body up, allowing the front legs to support it as they will when the dog is finished. This will help you position the back legs. They should be flush with the ground.
Place them on either side of the body, with the ends aligned with the center of the body and spanning across R7-15. At the highest points there should be 23 sts between the legs, across the dog’s back; and 22 sts between the lowest points.
Sew the legs in place along the edge that you previously sewed closed. Then, sew the last 5 Rounds of the leg to the body as well, along the fold line created.
HEAD

Count 12 Rs from the back of the head, and pin the opening of the back of the neck here.
Count 14 Rs from the front of the head, and pin the opening of the front of the neck here.
Pin all around evenly, checking that the head is facing the desired direction, then sew in place.
EARS
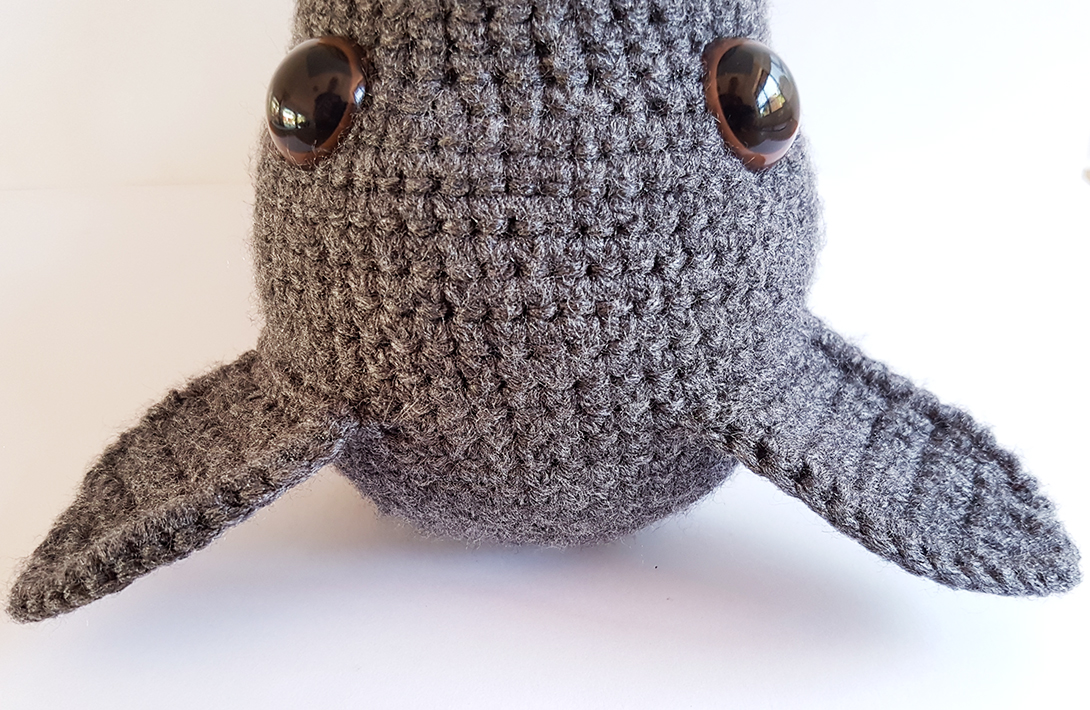
Position the ears at R11 (counting from the back of the head).
Leave a gap of 7 sts open between them.
Lay the ears flat on the head, pointing towards the back of the head as pictured (without giggling at his abnormal hair growth), and then sew along the free edge where your starting chain is, to attach them.

They can now be posed as desired.
TAIL
Attach across R4-9, in the center of the body.

*
Congratulations – your pup has a finished body! Let’s get together again next Monday for the exciting FUR TUTORIAL!
Edit: Part 2 is now live! Click here.
*

I would love to see how your dapper doggies come out – tag me @Projectarian with your #WinchestertonTheThird photos, or post a pic in our little Facebook group!
Remember to share this post with your fellow crocheters, and subscribe so you don’t miss out on future Projects!
~ https://www.projectarian.com/wp-content/uploads/2017/03/27-1.jpg
COPYRIGHT & SHARING
Although this pattern is free for you to use, direct copying is strictly prohibited.
If you would like to share the pattern, please Pin it, or share this page’s link.
You may only share ONE image of the dog from this post.
If you share this pattern, you must add this page’s link.
You are welcome to sell any physical item you make with this pattern.
PIN IT!

I just love this cutie pie! I’m going to make one for my hubs. We had our Trixie for 18 years and he misses her every day! Thank you for your amazing generosity and incredible patterns. You are a true artist. Hugs
Aw how sweet 🙂 I’m sure he’ll be very pleased! I would love to see pics of your finished creation! Thank you for the kind words xoxo
how do you get the pattern. i can’t get it
Hey Jessie! The pattern is in the very post you’re commenting on! It’s starts with an Intro, then you scroll down to find out what you’ll need to make it, then scroll down further for the instructions on crocheting the dog.
Is there a PDF file? Or a printable page for this?
Nancy, the pattern is not intended for downloading or printing, but you can use a third party like this website for that: https://www.printfriendly.com/ 🙂
Can you please explain what you mean by a ” magic ring ” please. Tia
Bernie, here’s a great page that will explain what a magic ring is and teach you how to do it 🙂 : http://www.planetjune.com/blog/tutorials/magic-ring-right-handed/
If you look on youtube it will show you. Search magic ring or magic circle. It is an option for starting pieces rather than ‘ch2, then do 6 sc in the second chain from hook’. Very easy to do once you figure it out. Hope this helps you
Is the post for the fur up, I don’t seem to be able to find it
It will be up next Monday! If you’re subscribed, you’ll get an email notification when it’s posted 🙂
First time that I will try an amigurumi. But this little one looks like my dog sitter’s dog and this lady is always there for me when needed. So it will be a nice little thank you present for her.
Thank you for the free pattern. 🙂
Wow, you’re so brave to try this furry beast as your first amigurumi – good for you! I’m sure your dog sitter will be very happy 😀
It’s my pleasure, Karen. Let me know how it goes!
I am confused as to why you would turn your work inside out?
The wrong side will be a little fuzzier than the right side, adding to the furry effect of the dog! Also, the stitches look a little different on the wrong side, so if you want the same look as my little dog in the pictures, you’d have to turn yours inside-out 🙂
Thank you. Is your yarn a 4 ply? Or can you give brand names used? He is do darn adorable I cannot wait to start!!
The yarn is Double Knit (Light Worsted / 8ply/ 11wpi) – you can find that, and more info under “PATTERN DETAILS” in the post. I used a South African brand of yarn called Charity, that’s why I specifically do not mention the brand (I know most readers aren’t in SA), and rather describe the type of yarn you should use.
I’m so glad you like him! Let me know how it works out 🙂
Hi there – just came across this pattern the other day and can’t wait to start it. I do have one question – if you are supposed to turn the work inside out after crocheting – how does that work when on the body and head you start stuffing before you are done with that particular piece? Any help would be appreciated. Thanks!
Hey Stephanie 🙂 I’m glad you’re excited to get started! With the head and body, you’ll crochet like normal to start with. After a few rounds you can turn the piece inside out, and just keep crocheting like normal, except now it will seem like you’re working into the “Wrong Side” of the stitches. You’ll still be working into the Right Side, however, but you’ll insert you hook from the inside of the body towards the outside. I hope that makes sense. Let me know if it doesn’t Haha 😉
OMG!! He is sooooo cute and lifelike. He looks very much like my little guy.
I will be making this one 🙂
I’m so glad you like him Linda! Good luck and let me know how your pup turns out ^_^
I just love this puppy and cannot wait for part 2 to come out.
I’m glad you like him, Cherie! Not too much longer to wait for Part 2 😀
ou dois -je m’inscrire pour faire partie de votre blog
Delphine, you can sign up here: http://www.projectarian.com/subscribe/ 🙂
Is there a way to print this pattern ?
Jane, you can try this: http://www.printfriendly.com/
Wow! It looks grate! What size are the eyes?
Thanks for asking, I forgot to include that ^_^
Safety eyes: 18mm
Safety nose: 18mm W x 15mm H
I’ve updated the pattern now with that info.
Ayala, I’m so embarrassed! I gave you the wrong eye size – I’m so sorry!
They’re supposed to be 21mm, NOT 18mm!
It’s not the end of the world if you use the 18mm ones though. I picked up the error when I saw a reader’s dog in progress and the eyes looked smaller – BUT! – the dog still looked really cute and at first I wasn’t even sure they were the wrong ones.
Anyway, sorry about that. Mistakes do happen, unfortunately.
i like the pattern. i can’t print it so will let it go
Jessie, the pattern is not designed to be printed. As a very high quality giveaway, it is designed to generate traffic for my website where I work very hard to produce high quality, original content. If you want to print it, you can use a third party such as: http://www.printfriendly.com/
Thanks for visiting 🙂
I am not able to do this,but would be interested in buying one just like the original!
Hi John, I’ve sent you an email regarding having one made for you!
Hi – I would love to try this – my schnauzer is black and silver – is it possible to do that colour or shall I try the colours you state? Thanks
Hey Christine 🙂 My customer’s schnauzer was in these colours, so that’s the only reason I used them. I know I’d really like to see some different colour combinations, so please use whatever colours your heart desires for your special customized doggy! You can easily substitute the Beige with Silver on your dog.
I would love to try that! not sure what wool to use as I only usually crochet in double knit or 100% cotton – will have to shop around for suitable wool
You should definitely give it a go, Christine! This particular doggie is crocheted with a double knit acrylic yarn – it doesn’t have to specifically be wool. A yarn made of blended acrylic and wool can work too.
Me encanta. Es como un tipo de perro yorkshire?? Como se hace para ponerle el pelo??
Voy a suscribirme.
Besos
Thanks Begona, I’m glad you like it! It’s a Schnauzer dog type! You can see how I did the hair in Part 2 here:
http://www.projectarian.com/2017/01/16/project-028-tutorial-make-fur-amugurumi/
Thank you for subscribing 🙂
Thank you for the neat pattern. He is so cute.
You’re welcome Bert 🙂 I’m glad you like him!
About how big is the finished project. Too darn cute!
Thanks Linda, I’m glad you like him! The finished pup is 25 cm tall.
First, thank you for the excellent pattern.
While making him I couldn’t help noticing that you have a small typo in Round 39 of the body. You’ve dropped from 21 sts to 14 sts with the instruction “sc2tog around”. I’m guessing you meant “(sc in next st, sc2tog) around”?
Hey Matt, I saw your finished pup on Instagram. Such a cutie 🙂
I’m glad you enjoyed the pattern – it’s my pleasure!
Thank you for pointing it out that mistake, I appreciate you taking the time to help!
Delicious!!!
I’ve a real schnauzer. And now I want to have this lovely version…
Thanks for shearing!!!
Hugs from Buenos Aires, Argentina
I’m sure your schnauzer will appreciate the tribute 😀 Thanks Florencia!
I love this. Thank you so much. I’m so glad I found your website. I
You’re welcome Bailey, I’m glad you found it useful 🙂
I love this I am the proud owner of two of these little dogs – I will be trying to do this as they look one pale grey and white the other deep charcoal and white – if it works I will try to send a photo. Thank you for the chance to get a pattern that will allow me to do this.
You’re welcome Carol. I love seeing the different colour combinations of my patterns so if you manage to get a photo that would be so awesome! Enjoy making your fuzzy little lookalike pups 🙂
[…] Check out this amazing FREE crochet pattern at the Projectarian blog today! Such a cute, life-like doggy with instructions on how to make your own fur, too! http://www.projectarian…. […]
Thanks for sharing!
I’m so proud of my first amigurumi, especially since i can’t even pronounce it! Your instructions are perfect and this is so stinkin” cute i just had to attempt it. I’m more of a scarf, cowl, dishcloth sort of gal so this was a real stretch for me. I am in southern California and made this for a Canadian friend. Just thought you’d like to know how far your generosity traveled. I have pictures but am not sure how to get them to you. I will try facebook.
Haha! I’m impressed that you’ve tried this pup as your very first attempt! And I’m really happy to hear that the tutorial was good enough to enable you on you first try. Thanks for the positive feedback Linda, and I can’t wait to see pictures! You’re welcome to post in our Facebook group https://www.facebook.com/groups/Projectarian/, otherwise you can email pictures to me at Hello@Projectarian.com 🙂
Just finished my dog and I love it. Your tutorial is great and easy to follow. Thank you!
(If you tell me how I can add a picture!)
That’s awesome – and you’re welcome! You can’t add a picture in the comments here but if you can post one in our Facebook group at the link:
https://www.facebook.com/groups/Projectarian/
Or on Instagram @Projectarian, with the #WhichestertonTheThird tag.
If you don’t use either of those platforms, you can always email me a picture at Hello@Projectarian.com.
Thanks Cathy – I can’t wait to see!
Hi. I haven’t started making this adorable schnauzer yet, but can you tell me how big he is?
You’ll find his size and any other information you might need under “Crochet Pattern Information” in this post.
He is 25 cm tall 😉
Problem is I can’t frind the heading ‘Crochet Pattern Information’ – where is it?
It’s right after the “Pattern Details” section, before the instructions start 😉
Thank you for such a well written and photographed tutorial. I’ve made two schnauzer’s now and am delighted how they’ve turned out. I would love to post a photo of them but I’m not sure how to.
I’m so glad you found it useful Janice! I’d love to see your photos. If you don’t want to share them in the Facebook group:
https://www.facebook.com/groups/Projectarian/
or on Instagram (tag @Projectarian and use the @WinchestertonTheThird hashtag), you can email me some pictures at Hello@Projectarian.com 🙂
What a terrific little dog, I am reasonably new to amigurumi but would live to make this, can you tell me when and how you attach the safety eyes etc, and does it need something to reinforce at the back of the crochet.
I’m glad you like the pup, Barbara! 🙂 The eyes and nose should be attached just before you start stuffing the head – while there’s still space to get your hands inside the head. Safety eyes and noses come with a stopper that you push onto the back when you attach them (like an earring with a butterfly). The stopper locks in place and wont come off, making them safe.
Hello Jessie, I was just wondering there did you get your safety nose from.
Hello. I was wondering where did you get the safety nose from?
Hey Sarah! I got mine from a yarn shop. I always find them in any fabric/yarn/craft shop or haberdashery that has sells buttons (they’re usually kept in the same section as buttons). You can also order them online from sites like ebay. I hope that helps!
Thankyou very much for this pattern…. Just love him, fantastic job I will give it a go.
You’re welcome Sharon, I’m glad you’ve found it useful! Good luck and I hope you enjoy making your little dog 🙂
Thank you! I really love this project and I’ m going to try it as soon as possible!
Thanks again, greetings from Italy ?
Hello Alessandra all the way in Italy! I’m very happy to hear you like the project and I hope you enjoy making your own little dog!
Lo explicas todo muy bien ya solo me falta unirlo para ponerle los detalles
Thanks Claudia, I’m glad you found the pattern easy to follow 🙂
I love him, I made him – THANKYOU for the fantastic pattern & descriptions & photo’s..
That’s awesome Sharon! You’re welcome and I’m happy to hear you found the pattern useful 🙂
Here is my dog thanks to you <3 [IMG]http://i66.tinypic.com/2ls8c9f.jpg[/IMG] It was really challenging for me but finally i did it. I learned making fur and felting with you! Million thanks (again) and hugs for you! I am so grateful for this amazing pattern :*
Ceren, your doggie came out really cute! You did a great job and I love how his hair came out all curly! Thanks for sharing your picture. I’m so glad you enjoyed the tutorial. Hugs back!
Your pup turned out so Cute! Great job!!!
I am very new to crochet and had only made a granny square blanket and a snuggle sack before seeing your excellent tutorial. I made my schnauzer and am very pleased with the result. I posted a photo to a facebook page that I follow and I am amazed at the response (3.5k likes so far!) Many people asked for the pattern, which I have shared. Thank you so much for making this project so easy with your detailed instructions and photos.
Liz, I’m so glad you found the pattern useful and easy to follow! Thanks for sharing it with your fellow crocheters, I really appreciate the exposure and I’m very happy to hear that it got a lot of attention – you must’ve done a great job with your pup! Thanks for popping in 🙂
Beautiful!
Thanks Virginia! 🙂
Looking for a papillon crochet dog pattern
Sorry Rosi, I don’t know of any
Loved this pattern. Had fun doing it. Just finished the body and want to start the fur but… I am concerned about the size of the project and will it actually stand up. The head seems large. Can you tell what the approximate dimensions should be for each body part.
Sorry Louise, I didn’t measure the body parts. The head is disproportionately large (compared to a real dog) and is almost the same size as the body. The finished size of the dog is about 25 cm tall, if that helps at all with your estimations. The dog won’t stand up, as it is designed in a sitting position, and it will definitely sit up if the pieces are positioned correctly. Pin all the pieces in position before you sew the dog together, and adjust the limbs to support the body. I hope that helps!
I did mean sitting. I used a light worsted, 3 mm hook. body is about 25cm and head is about 21cm. It just seems top heavy. I have pinned it. I will play with the legs placement some more and actually attach (not just pin) the head and see how I make out. thanks
I hope it works out! Let me know?
The pattern is amazing!! We just lost one of our girls and this is the perfect memorial. In the pattern you say to use 3mm/ size 11 hook. Would you elaborate please. Thanks in advance.
Sorry for your loss! A 3mm hook is metric. In Canada/UK sizes it’s called 11. In US sizes it’s called C/2. Enjoy the project!
Thank you for sharing your wonderful pattern free with the great photos. I should be able to turn this into a Scottie with black, very dark brown and very dark grey yarn. This is a terrific design.
Thank You for sharing your wonderful pattern with great photos for free. I should be able to turn this into a Scottie with black, very dark brown & very dark grey yarn. This is a terrific design.
My pleasure, Kim 🙂 A Scottie sounds like such a cute idea! I’m sure it will come out great!
It’s so beautyfull, oh! I love it, it looks just like my dog. I will make it!
I’m so glad you like it Miranda, and I hope you enjoy making a little look-alike of your dog!
Oh my god, this is so cute! Thank you so much for this pattern. I plan to make this for my dad. His buddy (and my first ever pet), a miniature Schnauzer, passed away from old age a fee months ago, and I know my dad misses him. I think this would be a nice present for him.
That sounds lovely Seth, I’m sure your Dad will appreciate that! You’re welcome and I hope you enjoy making your doggie 🙂
I am so impressed with this pattern! I’m almost ashamed to tell you I was so eager to make a Schnauzer for my youngest sister that I purchased a pattern. It’s not anywhere near as detailed or helpful as your pattern!! So, thanks bunches!! I definitely will be looking at your premium patterns when payday gets here.
I do have one question… What is the reason for turning the body parts inside out? This is the first amigurumi pattern I’ve seen that has that instruction… so I’m curious.
Hugs,
Bobbie McCord
Thanks for getting in touch Bobbie 🙂 I’m so happy to hear you like the pattern (sorry the one you purchased wasn’t so great!) and I’d be honoured to have you take a look at the Premium collection!
The crocheted fabric has a different texture on the other side, and is slightly fuzzier – that’s the only reason it’s turned inside out! You’re welcome to leave yours right-side out and it will still work, I just did mine the other way because I preferred the look, and so that instruction was included in the tutorial 😉
Thanks for responding to my question… I will have to make the parts and decide which side I like. I’m in the middle of a project for my sister, but the minute I’m done with it this darling Schnauzer is next! I’m sure I’ll be in touch…(I haven’t located the Premium patterns yet, but haven’t looked too hard either ?)
Hugs to you Jessie ?
I am having so much fun trying this. My friends say it will take a miracle worker to make a dog from the pictures of the pieces I have completed so far….lol. I am hoping to really surprise them. I am having a blast making it and I think that is part of the fun.
Haha! The pieces don’t really look dog-like on their own, but I’m sure your pup will come out perfect! I’m glad you’re enjoying it 🙂
I finished this for a friend who just lost his Schnauzer.
I’m sure that will make your friend very happy 🙂 I’m glad you found the pattern useful!
Could someone let me have the height and width and length of this gorgeous little creature. I want to upsize him to door-stopper size, please?
The dog will be about 25 cm tall, using the hook and yarn combination listed in the pattern 🙂 Good luck with your door-stopper – interesting idea!
How do you “stuff as you go” if you’re supposed to turn it inside out? I’m confused…
Hi Pam. The pieces should be turned inside-out at any point before you start stuffing them, and then just keep crocheting like normal, except now it will seem like you’re working into the “Wrong Side” of the stitches. You’ll still be working into the Right Side, however, but you’ll need to insert you hook from the inside of the body parts towards the outside. I hope that makes sense! 🙂
Thank you for this pattern, its brilliant, I have made one for a good friend of mine, not sure how to post a photo but would love u to see it
I’m glad you found the pattern useful, Mandy! I’d love to see your doggy! You can share a pic with us if you’re on Facebook or Instagram, at the following links:
Facebook: https://www.facebook.com/groups/Projectarian/
Instagram: https://www.instagram.com/projectarian/
Muy lindo me encantó,espero hacerlo
Thanks Gemma, enjoy it!
Hi, I just finished making this lovely shnouzer for my sons new apartment. He is not aloud to have a real dog…
Mine looks a little bit mor lokr a mouse, but its a qutie 🙂 is it possibul to ad a picture?
Thank you for the pattern.
Hey Ayala. I’m glad you found the pattern useful and I’m sure your son loves his mouse-dog! 😉 At the end of this post there’s info on how to share a picture with us. Can’t wait to see!
This pattern is amazing! Thank you so much! I’m quite new to amigurumi and I found your pattern very easy to follow with clear instructions. I made black on for my friend who has just got a Schnauzer pup. I Can’t wait to try some of your other patterns.
I’m so glad you enjoyed it and happy to hear that it was easy enough for a newbie to follow! Thanks for getting in touch, and please do try some of the other patterns!
Thank you
You’re welcome, Mary! 🙂
Have you ever though of, or can you make a pattern for knitted schnauzers? I just love the crocheted one but it’s a skill I have never mastered I’m afraid.
Hey Jan! I can’t knit so, No – sorry! Haha! My mum tried a few times to teach me and I guess the projects came out okay but it never caught on like crochet which comes naturally to me and is so much more versatile 😀
Hey i am in need of help. I have done the head part twice now with two different hook sizes. I live in the US. I started the first time with an f hook which is 3.75. My head was huge. The second time i did it with my d hook size which is a 3.25. Its still huge. The next step i have is a b 2.25. Do you think i need to use my b hook for the head? We dont have a 3.0 mm in the US.
Hi Kristen! If The B hook is your next closest size down and you want a smaller head, then yes, you should use it 🙂
Please please please make me one, I am willing to pay for this sweet guy, looks just like my winston
Hi Lois! I’d be happy to! I’ll email you shortly with the order details 🙂
Obrigada eu amei o seu cãozinho
Muito gentil de sua parte colocar a receita dele para todos verem como foi feita parabéns pelo belíssimo trabalho não encontrei nenhum erro é tão lindo que parece real.
Thank you Elisângela!
I cant get the link to work for part two xx
Hey Paula. There are multiple links throughout the page that should send you to Part 2. I tested all of them and they work fine from my side so I have no idea what the problem could be. Here is a direct link. Please get in touch if it doesn’t work! http://www.projectarian.com/2017/01/16/project-028-tutorial-make-fur-amugurumi/
I am so so glad I found this pattern! My grandma’s Schanuzer passed a couple months ago. We all miss him so much. I can’t wait to make this and give him to grandma for Christmas. Thank you for making this a free pattern.
Thanks Rebecca, I’m glad you found it useful! I’m sure your grandma will love the gift!
This is brilliant and just what i’ve been looking for. My sister in law has a black lakeland often mistaken for a schnauzer but v similar beard and eyebrows and will enjoy attempt to recreate Magic’s coloring. Off to but wool immediately…your pattern and intructions are beautifully clear. Thx for sharing.
Glad I could help! I hope you enjoy making your Magic lookalike!
Hey, I absolutely love this dog a dead hoping to make him for my friend’s little boy. I am new to this however and was just wondering if you slip stitch to join each round as you go? It may be a very silly question but as I said I am a beginner ? Thanks!
Hey Naomi! I’m glad you like him and I’m sure your friend’s little boy will be very happy! You shouldn’t join each row with a SS, as this pattern is worked in the round (in a continuous spiral). At the end of a round, simply crochet into the next st to start a new round. Check out this post – tip #6 will help you keep count of your stitches as you learn this new method: PROJECT #015: 6 SKILLS THAT WILL HELP YOU MASTER AMIGURUMI
Can you buy one already done .
Yes you can! Email me at Hello@Projectarian.com of you’d like details on how to order
I love this pattern. I want to make it for my granddaughter who has a Schnauzer dog! Thank you for sharing the pattern!
You’re welcome, Ruby! I’m sure your granddaughter will love it!
Thank you for sharing this pattern .l have just completed “Clyde”
He is being donated to a Schnauzer social group that raise funds for Schnauzer rescue.
That’s awesome! I’m glad you found the pattern useful!
Am I missing something? Where is part 2 please?
Hey Beverly, there are multiple links throughout the page – you can click anywhere that it says “Part 2” and it will take you there. Did you try that? Here is a direct link in any case: http://www.projectarian.com/2017/01/09/amigurumi-dog-fur-free-crochet/
Jessie, I am so in love with this sweet puppy! I know that one or two granddaughters would absolutely be thrilled to have one. This is truly a work of art and I have to say you are one talented lady!
Lucky granddaughters!! Thank you so much for the kind words Regina. I’m so glad you like the puppy and I hope you have lots of fun making your own 🙂
My granddaughter has a Schnauzer, and I want to make a stuffed one for her
I’m sure your daughter will be pleased! Enjoy your project!
Hello! Thank for the pattern
I made one, you can see it on my Website
https://croquecrochetblog.wordpress.com/2017/09/06/chien-schnauzee/
Well done! Your little doggie is very dapper-looking! Thanks for sharing on you site, although your link to the pattern doesn’t work – there’s a typo in it. You can use this one: http://www.projectarian.com/2017/01/09/amigurumi-dog-fur-free-crochet/
Hi I am new to crochet and when I saw this I was so excited. We have a Shnauzer and your crochet one is perfect! Thanks so much for sharing him. Xxoo
You’re welcome Lorene! I’m glad you like it and I hope you enjoy crocheting your own version of your pet!
Where and for what price can I buy the finished product? SCHANUZER DOG
I’ll pop you an email, Lydia!
Thank you very much! It’s a beautiful pattern, I will try it. 🙂
My pleasure Mary, I hope you enjoy it!
Gracias por el molde, el perro muy lindo y bien logrado, perfecto para el próximo año chino del perro otra vez muchas gracias. Sara.
You’re welcome Sara, I’m glad you like it!
Thank you for the pattern. I made a Tramp one about 2 months ago. Now the lady wants a baby Tramp. I realize yours is a little over 9 in. tall. So I am only going to make the first part 36 stiches across instead of the 48. Mine will probably only be 12-14cm tall. Which will be about 5 in tall. Just the right height I want. I just finished a puppy Lady.
Thank you again for your pattern.
You’re welcome Kitterkat! Good luck with re-sizing yours and I hope you enjoy the pattern!
Absolutely gorgeous, can’t wait to make him.
Thanks Christine! Hope you enjoy the pattern!
Hello. If I wanna buy from you how can I do? Would be possible? Thank you in advance Monica
Hi Monica! Yes, you can order something to be made specially for you! Just pop me an email at hello@projectarian.com and let me know what you want, and where you are in the world so I can give you relevant prices and shipping options! xx
Where do you get your safety eyes? And how do you put them in the pattern? I’m having a terrible time trying to fit them btwn my stitches.
Hey Laura. I buy them from my local yarn shop. Fabric shops usually keep them in the haberdashery section too. The eye has a threaded plastic pip on the back. You should be able to push that pip through the stitches without any hassle. If you’re using a similar hook and yarn combination to the pattern, and the recommended size of eyes, the mesh of your crochet should easily allow the pip through. Then you squeeze the backing piece on to secure it. It’s strange that you’re struggling to get them in – I’ve never had that problem with any eyes on a project. Maybe your eyes have an odd design? They should look like this:

I have a question: when making the head and marking the middle og the face – do you count 14 stitches from you start the row and mark it? Or later in the row? When you are
Hi Jane. You mark the 14th stitch in R20, as you make it.
You are amazing! I’m so impressed! Great sharing!
You’re welcome Mimi, I’m glad you like it!
hi can you please tell me how I can print this pattern so I can make one for a friend that has Schnauzers
Hi Jennifer. You’ll need to use a third party printer like this one: https://www.printfriendly.com/
Please note however, that this pattern is not intended for printing so I haven’t composed it with that in mind. It is very picture-heavy and spaciously laid out.
He (or she) is adorable! I’m going to attempt to make this for a friend of mine. Her Schnauzer’s name was Snuggles. You are very talented and I want to thank you for this great pattern! Do you think you will do one of a Beagle? They are very lovable dogs.
Hi Debbi. You’re very welcome, I’m glad you like doggie and I hope you enjoy the pattern! Beagles are the cutest! But I don’t have plans to make anymore dogs, this one was already a far deviation from my usual animals (which is why I made is free) so I probably wont do anything similar again.
O…M…G! LOVE IT! WHO EVER CREATED THIS TOTALLY GETS 10?’S FROM ME!!! We used to have a schnauzer! ?
Thanks so much for the 10 star rating!!!
Hi there I love this patern but I can’t crochet is there anyone who can crochet this for me I will pay them my dear friend has just lost her dog just looked like this I would love to give her she is so upst at moment could someone please help
Regards lucy.
Hi Lucy!I’ve sent you an email regarding having one of these made for your friend <3
I am a little over a year late finding this great pattern. I crochet and felt but am confused about the ply of the yarn. Most of yarn in the states is 4 ply. You are using an 8 ply so do I just use a double strand?
Hi Janine. The great thing about amigurumi patterns is they never go stale, so it doesn’t matter how late you join the party! There are still many people only discovering this pattern now, and asking me questions about it, so you’re not alone 😉
Yarn weight: In my experience, using two 4ply threads does not equal an 8ply thread, it always comes out substantially thicker than 8ply. If you can’t get Double Knit, Light Worsted, 8ply or 11wpi in the colour/type you want, I’d suggest using the next weight UP rather than DOWN. Go for a thicker weight, rather than thinner one because it will make better fur. You might struggle to make fur with 4ply (I certainly do).
Hook size: The only equivalent I know of for a 3mm hook is UK size 11. As far as I can tell from research, it’s between a US size 2/C and size 3/D. So I’d recommend one of those two. You’re probably better off using the size 3/D with the weight of yarn specified for the pattern (if you can get the correct yarn).
If you end up using a thicker yarn, go up a hook size to a US size G or even an H, depending on the yarn. You’re aiming for a tight enough mesh that your stuffing wont show through, but not so tight that it becomes physically hard to work with.
I hope that helps!
Oops! Also my crochet needles do not seem to correspond to yours. Just going to practice till I hear from you.
Can you show me how to sew the head onto the body? I’m having trouble with it. Thanks!
Hi Laura. If you give me more detail I’ll try to help. Are you struggling to place the head in the correct position, or struggling with the actual stitching, or something else?
I am struggling to place the head in the correct position.
Thank you for this great pattern. We just lost our sweet Schnauzer girl last week. I’ll be making this for my husband.
I’m sorry to hear about your loss, that’s very sad. I hope you enjoy the pattern, and the sweet reminder of you furbaby
minha linda boa noite!
sou de João Pessoa Pb no Brasil,gostaria de agradecer por tamanha generosidade,seus trabalhos são incríveis.Gostaria de saber se a abertura da cabeça fica para frente e como vc consegue esconder.Obrigada
Me chamo Suzete
Hi Suzete! You’re welcome and I’m glad you enjoyed the pattern! I translated your comment but I still don’t understand the question about the head. Could you try translate it to English for me and I’ll see if I can help?
Made him for a friend of my Mom-in-Law. She wanted it for her daughter, who has a Schnauzer. He turned out pretty cute!!
I’m glad you found the pattern useful, Shelley! Thanks for stopping by 🙂
I was wondering if you sell already made schnauzer dogs?
Hi Lynn! Yes I do – I’ve sent you an email with details 😉
Thank you so much for the schnauzer pattern #027 & #028. I have a mini schnauzer so I tried to make mine to look similar to my dog, Chloe. This was my first amigurumi and my first needle felting. I wanted mine to look like it had hair all over it, after I got done crocheting it. I did the body needle felting with a Lion Brand yarn that is variegated black, grey, and a cream color. Then I did around the nose, the chest, and on the paws with an off white wool felt. My 5 year old niece seen it this morning and asked me, “Is that a stuffed Chloe?” At least it was recognizable as a dog.
Thank you so much for your generosity in sharing your patterns.
Hey Tammy! That sounds amazing, I’d really like to see how your dog came out with fur all over it! Any chance you could share a picture with us? If you’re on Facebook, you can share on with the Projectarian group here.
I only have access to the internet at work and cannot crochet during working hous. How can I make this for my daughter and granddaughter without being able to print it?????
Hey Iris! This pattern isn’t intended for printing, since it has a lot of pictures to make it easy to follow. If you really need to print it, you can use a third party printing site like this one: https://www.printfriendly.com/
This pattern is awesome!!!! Thanks for sharing!!!
You’re welcome Alison! Enjoy it 🙂
I absolutely love this Schnauzer, but cannot crochet. Do you sell them ?
Yes Dawn, I do sell them! I’ve sent you an email with details 😉
Artista,un millón de gracias, por tu generosidad en compartir tu excelente trabajo. Un fuerte abrazo
You’re welcome Mati! Thanks for visiting!
I would like to attempt this , I am NOT seeing how to do the curly fur. Can you please tell me where I can go find it. Thank you… Barb
Hi Barb! There are multiple links throughout this post to Part 2 for making the hair, but here is a direct link for you in case you can’t find it: http://www.projectarian.com/2017/01/16/project-028-tutorial-make-fur-amugurumi/
Enjoy the pattern! 🙂
Thank you so much for your pettern♥️I love ♥️♥️♥️
My pleasure Vipicha!
I have made my schnauzer. I think his head is too big. I have used double knit wool. I also cannot get him to sit up because he seems top heavy. Please can you help
Hi Christina, sorry to hear you’re having trouble with your project. If your dog is already sewn together it’ll be difficult to fix but not impossible. (That’s why it’s always a good idea to pin everything together before you sew it, in case it needs adjustments). If the head is attached too far forward, it could un-balance your dog. If the head is too big, you may have over-stuffed it, and you should remove some stuffing. If you can’t open it up to take the stuffing out, another option is to try attaching the legs in different positions to support him (pin them in place first). If that doesn’t work either (or if you prefer to try something else), you can weigh down the body. Do do this, you’ll have to take most of the stuffing out of the body. Find something to use as a weight; ball bearings, a pebble, etc. Put the weight inside the body, close to the bottom. Pin the head on to make sure the body is heavy enough to keep him upright. Add more weight if needed. I hope this helps!
I had no problem finding yarn and eyes for my project, but every craft supply I have checked does not carry the nose. Where did you find yours?
Linda, I found my nose at my local yarn shop. Some people struggle to find eyes and noses in their area, so they purchase online. Hope you find some!
Por favor me lo podrian enviar el patron en español muchas gracias
Hi Karina, unfortunately I wont be able to get this one translated to Spanish. Sorry for the bad news 🙁
My daughter and her family recently had to put down their beloved schnauzer. I am a crocheter but this might be beyond my skill level. Could you tell me what the cost would be to have one made?
Thank you!
Hi Crochet Grandma, I’ve sent you an email regarding the custom order of a pup for your daughter and her family.
Not sure what you mean by invisible decreases being inside out. Could you explain please.Do you have to do them differently because of the pieces being turned inside out?
Hey Sharon. I suppose my wording is a bit confusing, sorry! When you do an invisible decrease and then turn the piece inside out, you will see 2 stitch loops where the decrease is. So what I mean to say is, you should turn your piece inside out first, and then do you invisible decreases as normal. Does that make sense?
Yes thank you so much. Going to start making this adorable dog soon!
Thank you for this great pattern! It was really well written and easy to follow. I didn’t think I’d manage to make him, but with your explicit instructions I’m so glad to say I did!
That’s great news! Thanks for the feedback Marisa, I’m so happy you enjoyed the pattern 🙂
I just recently got into making Amigurumi, and this is the cutest thing ever…PLUS i have a schnauzer…but whats more perfect is that my schnauzie pups name is actually Winchester!! So now i HAVE to make this (I may have to try to make it with black yarn though to match my little guy) 😀
It’s fate MaryHannah! The universe has guided me to write this pattern JUST for your little Winchester! Haha! There have been a few different colour combos popping up in the Facebook group and it’s always nice to see new ones. Enjoy the pattern 🙂
This is absolutely adorable. Glad someone sent this link!
Buenas noches
Me podrías ayudar no entiendo en la parte del cuerpo el R9 que dice -22 es una disminución o que punto es. Gracias de antemano
Hi Abigail
R9-22: SC in each st around. (48)
This means from R9 to R22, work 1 SC into each st.
So that’s 14 straight rows with no increasing or decreasing.
I hope that answers your question!
Gracias
Hi I would love to pay someone to make this for me. If interested email me. Barbied6223@aol.com
Hi Barbie, I’ve sent you an email 😉
Hello!! Could you explain to me what is the meaning of the numbers on the end of each sentence?
ex: R1: 6 SC into a magic ring. (6)
whats the meaning of the firts 6? and the last?
and R1 mean row 1?
thanks!
Hi Natene!
R stands for “round” or “row”
The number at the end of each round/row is the total amount of stitches you will have by the end of that round.
Perfeito!!! Lindo!!! Parabéns!! Beijos do ??!
Thanks Tamy, I’m glad you like it!
Excelente trabajo, tiene una ternura fantástica. FELICITACIONES.
Thank you Maria!
Thank you so much for this awesome tutorial and the fur one that follows!
Oiê tudo bem eu tô tentando fazer o cachorrinho mais tá difícil mais vou conseguir são lindos seus trabalhos bjs
Hello! I hope you enjoy the dog pattern
Hey there! Thanks for this amazing pattern!
I’m wondering how exactly to make an inside out invisible decrease? Am I suppose to pick the outside loops instead of the inside ones? I’m confused!
Thanks!!
Yes Odile. An invisible decrease is worked into FLO (Front Loops Only). So, once you’ve turned your crochet fabric so that the wrong side is facing, the loops you see in front are now the Front Loops (these were the Back Loops until you turned the fabric). So now you simply work your invisible decrease in FLO. I hope that makes sense 😉
I made one, mind doesn’t look as good as yours.
I made it for my grandson he loves it.
I’m so glad you found the pattern useful Cynthia, and I’m sure you got lots of brownie points from your grandson!
Hey there! Amazing pattern – thanks! I’m just not sure how to do inside-out invisible decreases… help?
Hi Odile. Once your workpiece is turned inside out, you will be working into the “wrong side” of the stitches. And invisible decrease is worked into the front loops only (FLO), so simply work into the FLO of the wrong side of the stitches. Hope that helps!
Olá, não entendo as abreviações para fazer as orelhas,CH,S S e hj,por favor me ajude
Hi Ana. Near the beginning of the page there is a section called Abbreviations that will tell you what those abbreviations mean 🙂
Merci pour le patron, je viens de terminer le mien et il ressemble beaucoup à mon chien.
You’re welcome Francine, I’m glad you enjoyed the pattern!
Dear Jessie,
Thank you so much for sharing your beautiful design for a lovely crochet dog (free pattern plus excellent picture tutorial how to sew/finish this lovely dog so easy to follow and for free! Incredible!). And you know what? All the blogs and websites grabbing good ideas from creative people like you and making money with advertisings on site by promotion there sites on Pinterst. Dont get me wrong – I am so happy to found you and this wonderful free pattern for a crochet dog. But I think: Make people like me and the nice people who comments before to help you to fulfill your dreama and place a “donate via paypal button” on all of your excellent free crochet pattern! I am sure: Myself and other creative people would like to thank you for your free crochet pattern because we love your creativity and your way to explain everything so well to us with your great sence of humor! I will coming back and have a look if there is a way to do something good to you.
I am very sorry for my bad english, I am from Germany – but even I dont speak Englisch so good I could easily follow your free crochet dog pattern! I hope, my comment is understandable for you.
Kind Regards and thank a lot again!
Nicole
Hello Nicole! Thanks so much for your kind comment and I’m really happy to hear you enjoy my work. I think I will indded take your advice and make time to add a button to all of my posts 🙂
This is beyond my crochet capability which extends just to scarves. But, I’d love to buy one already made. Any link or site?
Hi there! I do take the occasional order for finished products. If you’d like to place an order please email me at hello@ projectarian.com 🙂
O Love this pattern, and I’d like to suggest that you do other dogs, like yorkie, it would be great, just lost my dog and would like to make an amigurumi of him for my house. Love your work!
Thanks Mariana, I’m so glad you like the pattern! This was a once-off order that I wouldn’t usually make so I won’t be adding more dogs to my pattern range although I have many other animals planned. Sorry to hear you lost your little friend <3
This is my first attempt at thos type.of crochet.Although trying..been a ton of great experience!! Haave learned soooo much!! Am in final stages of “grooming” my version of Winston.Would love to share photos of him as I proceeded if you would like to see them!! Thanks so much for this pattern.My friend wanted to adopt a snauzer however they can not…they CAN however adopt this one!!! Win win!! Thanks a million!!
Hey Jan, I’m so glad you like the pattern! You’re welcome to share you pics. There are details near the end of the post about how to share pics with me on Instagram or Facebook. I’m sure your friend will be very happy with their new pet!!!
would you sell one just like this? i don’t do this but wanted one for a gift.
Hi Jerhan! Unfortunately I don’t sell any physical items, I only write patterns for making them. Sorry about that 🙂
I know it’s been a while since you first posted this, but I saw it and am going to make it for my sister-in-law’s birthday gift in November. Her schnauzer is half dachsund, so I’ll be shortening the legs a little and using the same colors as a Rottweiler, but I wanted to thank you in advance for this cool pattern!
That sounds really cute, Mercy! Enjoy it 😀
I am having trouble understanding how to do the mouth. Do you have a video on this???
Hi Jackie! There isn’t a video for this one, unfortunately. All you have to do is stab the felting needle into the fur and form a line in your fur. Does that make sense?
Made a schnauzer 17/08/2019 first attempt not bad!
Congratulations Paula! 😀
Is the black dog the same pattern?
Hi! The only dog I’ve made is the grey and beige on pictured in this post. While someone may have used my pattern to make a black dog, without a picture I can’t confirm if it’s the same pattern.
Thanks so much for this. We have friends who are breeders and have FINALLY fallen pregnant with their first baby (quite late in life, Daddy will be 58). I’ve finished a light waffle wrap for bubby but wanted to make the perfect snuggle as well. I may alter your pattern a wee bit (hope that’s OK), just to ensure it is truly individualised for this miracle baby.
Your ideas have helped me and inspired me on what felt like an intimidating gift.
Hi Fiona. Wow, that’s unbelievable! Congrats to them! You’re welcome to alter my patterns, the only rule pertaining to that is you may not claim any party of my design as your own. I hope you enjoy your project!
Thank you for this cute doggie! I loved this project. I would like to show you, but don’t know how to pin it.
Hi Marianna! I’m glad you enjoyed the project! You can tag me on social media using @Projectarian or email me your pics at hello@projectarian.com 🙂
How do I make the eyebrows and beard
Here you go: https://www.projectarian.com/2017/01/16/project-028-tutorial-make-fur-amugurumi/
I need the beard pattern